


You've got a pair that looked right in the shop, zipped easily at home, and then fought you in the saddle. The calf pinches in a rising trot, the heel lifts at every stride, or the shaft jams behind your knee in two-point. You're not bad at shopping. You've probably bought a boot built for a different kind of riding than the riding you do.
That mismatch has a long history. The Victoria and Albert Museum collection record notes that boots were largely reserved for riding, hunting, travelling, and military use before the eighteenth century, and later styles ended just below the knee with turned-down tops that exposed softer leather for walking. Modern best English riding boots still carry that trade-off between protection in the saddle and comfort on foot. I would start with your discipline, then fit, then material and price. Brand comes last.
Table of Contents
- Quick Picks by Discipline and Riding Style
- Safety Checks for Heel, Sole, Toe and Cuff
- Leather or Synthetic and What Each Costs to Keep
- Price Tiers and Real Cost
- How to Measure and Try On Tall Boots
- Matching Boot Style to Your Riding Life
- Choose Your Boot Before You Buy
Quick Picks by Discipline and Riding Style
Find your row first. A boot that's ideal for formal arena work can be a poor choice for a long barn day, and a walkable paddock boot won't give you the formal line a dressage judge expects.
| Discipline | Boot style | Priority in the design | Best when |
|---|---|---|---|
| Dressage | Tall dress boot with rigid shaft | Structured leather, defined heel, formal finish | Formal arena work and competition dress |
| Jumping and eventing | Tall field-style boot | Flexible shaft at the knee, secure heel, lightly textured sole | Frequent rising trot, two-point and cross-country |
| Hunter and equitation | Tall field or hunt-style boot | Clean lines, firm toe box, comfortable walking | Show ring work with traditional turnout |
| General-purpose and trail | Paddock boot with half-chap | Ankle support, flexible leather, easy on and off | Mixed riding, changing calf size, daily wear |
| Barn work and commuting | Paddock boot | Walkable sole, lighter weight, water resistance | Long days on foot and casual rides |
Three rules from the table
- Choose rigidity for formal work: A rigid shaft holds a clean, quiet line in dressage, where your lower leg stays largely still and turnout matters.
- Choose flexibility to move: If you jump, gallop cross-country, or walk courses and fields, the shaft has to flex at the knee so you can rise, sit, and fold without the cuff digging in.
- Choose the lowest profile that works: For mixed riding, the lowest-profile option with a defined heel often wins because it's easier to walk in, easier to replace, and less fussy about calf shape.
Dressage rewards structure because polish and a stable leg picture are part of the job. Jumping rewards freedom because a shaft that resists your knee will push you out of balance over a fence. Hunter and equitation riders sit between those poles, needing clean turnout without giving up comfort during long show days.
General-purpose and trail riders often get better value from a paddock boot with half-chap. You can adjust or swap the chap as your calf, breeches, or season changes, and you aren't locked into one tall shaft for every job. If you're clarifying what English turnout expects in the first place, our guide to riding English style sets out the basic distinctions.
Practical rule: Pick the row that matches most of your weekly riding, not the one show or clinic you hope to enter next year.
Once you've found your discipline row, read the safety, material, and fit checks through that lens. Those sections explain why each priority in your row matters and how to test it before you pay.
Safety Checks for Heel, Sole, Toe and Cuff
Safety comes from how the boot interacts with the stirrup, not from polished versus matte leather. I would reject a beautiful boot that fails the heel, sole, or toe checks, because those three features control whether your foot stays put and can release cleanly in a fall.
| Feature | What to check | Why it matters |
|---|---|---|
| Heel | Clearly raised and defined | Limits how far the foot slides through the stirrup |
| Sole | Smooth or minimal tread, no aggressive ridges | Supports a quick release; heavy lugs can catch |
| Toe | Enclosed, firm toe box, no forefoot binding | Protects the foot and keeps the stirrup fit predictable |
| Shaft | Snug around the calf without restricting circulation | Protects the inner calf and keeps leg contact stable |
| Cuff | Ends below the back of the knee | Leaves knee flexion free for riding |
Heel and sole
Start with the heel because it does the most safety work. The equestrian sport injury review in Current Sports Medicine Reports supports prioritizing a defined heel, a smooth or minimally treaded sole, a closed toe, and a structurally supportive upper, and matching boot-and-stirrup dimensions rather than judging the boot alone. A clearly raised heel helps stop your foot sliding too far through the iron. A flat fashion heel, even on a tall boot, doesn't do that job.
The sole matters for the opposite reason. You want enough grip to feel secure, but a smooth or minimally treaded sole supports emergency release. Thick, heavily lugged soles built for mud can catch on the stirrup tread and increase the chance your foot stays trapped. If you do lots of yard work, change into yard boots. Don't ask one aggressive sole to do both jobs.
Toe, shaft, and cuff
An enclosed, firm toe box protects your toes around hooves, gates, and mounting blocks. It shouldn't be so wide or bulky that your forefoot binds inside the stirrup, because a boot that wedges into the iron changes how it will release. Slide the boot into your usual stirrup at home or in the shop if you can.
A supportive shank can spread the pressure from the stirrup across your foot, which helps during long schooling sessions. Too much stiffness has a cost, though. It can limit your ankle's natural drop and make your lower leg feel braced rather than elastic.
Test the whole boot in a riding posture, wearing the socks you normally ride in. Simulate rising trot and a two-point position on a step or mounting block, then check that your heel holds, your calf stays aligned, and no sharp pressure points appear. Use the table as a shop-floor checklist, and walk away from any pair that fails the first three rows.
Leather or Synthetic and What Each Costs to Keep
Leather moulds to your calf and foot over time and rewards regular care, while synthetic boots arrive ready to wear and handle wet conditions with less fuss, but breathe less and can crack or peel as they age. Neither material is universally better. Your schedule and your tolerance for upkeep should decide.
| Factor | Leather | Synthetic |
|---|---|---|
| Break-in | Takes weeks to mould to your calf and foot | Usually shorter, shaped by the lining |
| Breathability | Moderate, improves with wear | Often lower, can feel warm |
| Water resistance | Good with regular conditioning | Generally higher out of the box |
| Ongoing care | Clean and condition regularly | Wipe clean, less upkeep |
| Long-term life | Can last many years with care | Shorter service life; can crack or peel with age |
| Typical cost tier | Mid to premium | Entry to mid |
What break-in actually demands
A new leather tall boot can take weeks to mould to your calf and ankle. Buy it a few days before a show and you'll spend that show thinking about your feet. Walk in the boots at home first, then school in short sessions, and let the ankle crease form before you ask for a full lesson or a long hack.
Synthetic boots usually feel easier on day one. That early comfort is real, especially for a rider who needs a serviceable pair now or a child who'll outgrow boots quickly. The trade-off shows up later in heat and lifespan. If you ride through hot summers, a less breathable boot can leave you with damp socks and rubbed heels.
Weekly care in real life
Leather care is simple but important. Wipe off dirt and sweat with a damp cloth after riding, condition every few weeks of regular use, use boot trees or shapers, dry the boots slowly away from direct heat, and store them upright so the shaft doesn't collapse and crease. Skip that routine and good leather dries, cracks, and loses its close fit.
Synthetic care takes minutes. Wipe the boots clean, let them dry, and check seams, zips, and linings regularly for peeling or splits. If you're honest that conditioning won't happen, I would choose synthetic and accept a shorter life. Settle the material question first, then judge price over the years you expect to ride.
Price Tiers and Real Cost
Price follows construction more reliably than it follows a logo. A cheap boot isn't cheap if you replace it after one season, and a premium boot isn't extravagant if it serves for years of frequent riding and can be resoled. The wider market is large, since a 2025 market analysis by Deep Market Insights valued the global riding-boots market at USD 1.6919 billion, which is why tier and construction are more useful filters than endless model comparisons.
| Tier | Typical construction | Best for |
|---|---|---|
| Entry | Synthetic or lower-grade leather, simpler construction | Occasional riders and trial pairs |
| Mid-range | Better leather, lining and stitching | Regular lessons and shows |
| Premium | Finer leather, more hand finishing, option to resole | Frequent riding and long service life |
Judge each tier by use
Entry boots suit occasional riders, growing riders, and anyone testing whether a tall boot or a paddock setup suits their life. Expect simpler linings, less refined shaping, and materials that show wear sooner. That's acceptable if the heel, sole, and toe still pass your safety checks.
Mid-range boots are the sensible centre for most regular riders. Better leather, lining, and stitching usually mean a closer fit after break-in, steadier zips, and leather that responds to conditioning. Premium boots add finer leather, more hand finishing, a more sculpted shaft, and often the option to resole, which extends useful life.
Divide the price by the years you realistically expect to wear the boot. A mid-range pair kept for five years can cost less per year than a bargain pair replaced every season.
Set your budget tier before you shop, based on how often you ride and whether you'll do the upkeep. Our breakdown of horse riding costs helps you place boots inside the wider cost of lessons, tack, and care. Don't chase the cheapest price on the page, and don't stretch to premium if a mid-range boot already matches your discipline and measurements.
How to Measure and Try On Tall Boots
Fit is a measurement problem, so measure rather than trusting a size label. Labels differ between makers, and an explanation of how vanity sizing works from Robosize shows why a number on a box can't replace your own tape measurements across brands and categories.
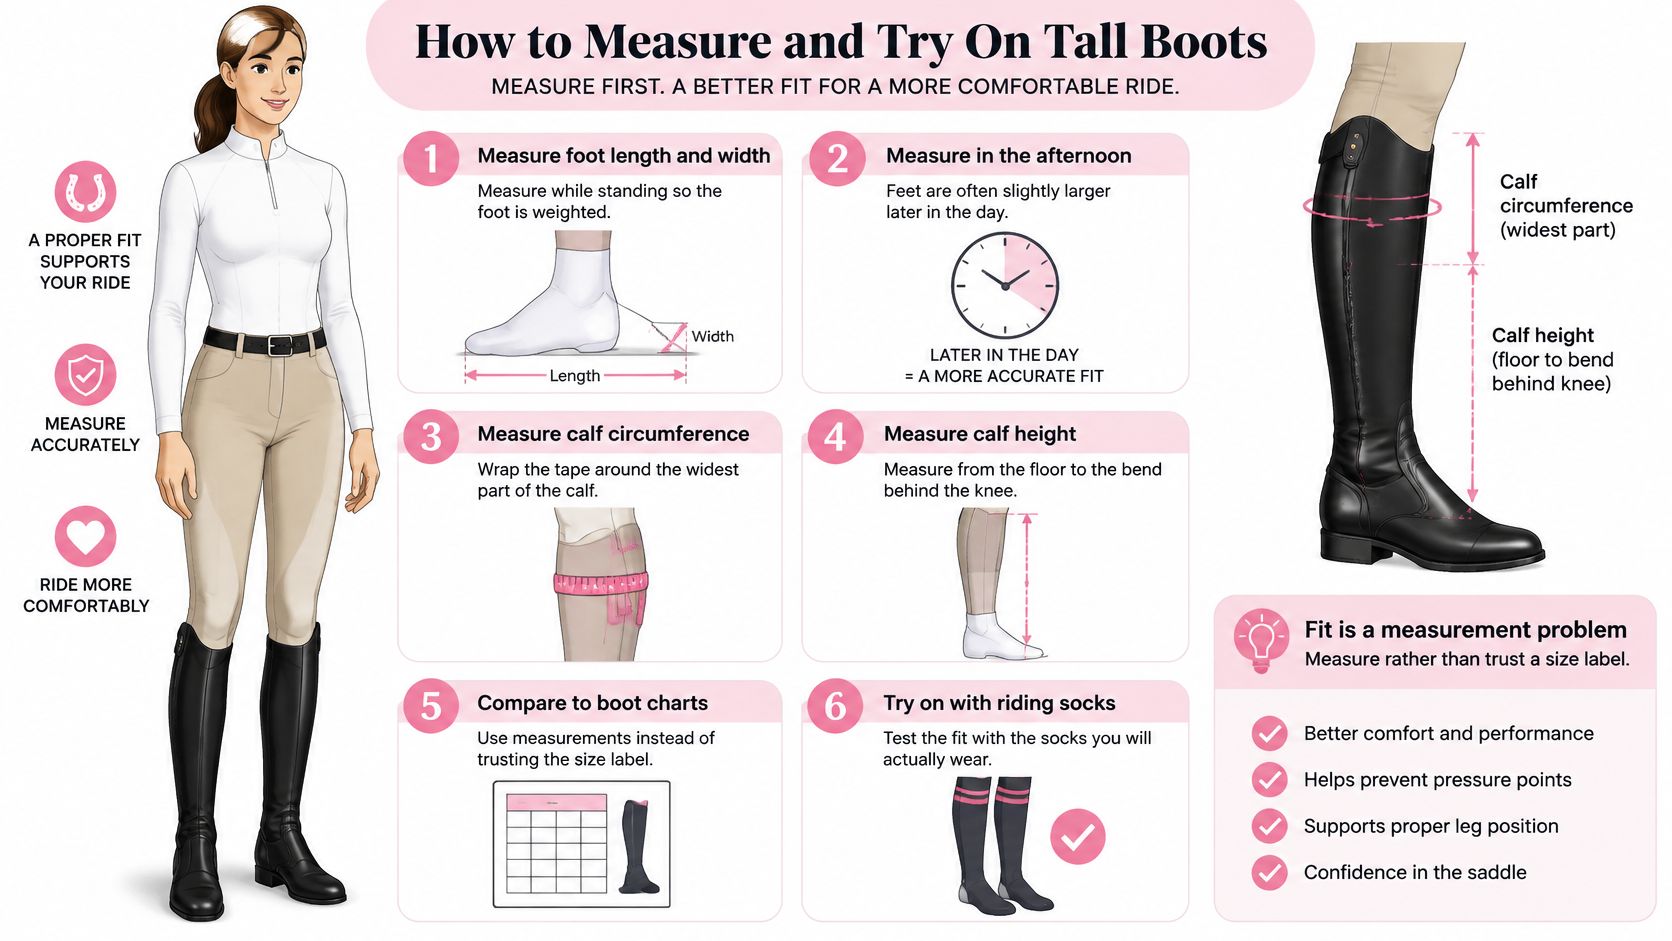
The infographic below lays out the measurement sequence before you compare any boot chart.
Measuring steps
- Measure foot length and width: Stand with your full weight on the foot, ideally in the afternoon when feet are at their largest, because an unweighted morning measurement can lead you to a boot that's tight by evening.
- Measure calf circumference: Wrap the tape at the widest point of your calf and again at the height where the cuff will sit, since a shaft must clear both points without squeezing.
- Measure ankle circumference: Measure above the ankle bone, because a roomy ankle lets the heel lift and a tight one stops the ankle flexing naturally.
- Check boot height: Measure from the floor to below the back of your knee and compare it with the maker's listed height, leaving room for the boot to settle as the ankle creases.
- Dress for the test: Try boots with the socks and breeches you ride in, including winter socks if you ride in cold weather, because a thin show sock hides problems a thick sock will expose.
The Michigan Foot Doctors equestrian foot and ankle guide describes tall boots as a fit-and-motion system where the heel seats firmly, the shaft stays snug without restricting circulation, the ankle flexes at the natural joint, and the cuff terminates below the back of the knee. It also supports testing in a riding posture with your normal socks to check stable heel contact and calf alignment in rising trot or two-point.
This short video reinforces the try-on movements after you've recorded your measurements.
The pass or fail test
- Move like a rider: Stand, then simulate rising trot and a two-point position, checking that your heel stays down and the shaft stays snug without pinching.
- Find pressure points: Pay attention to the back of the calf and across the instep, because mild firmness can ease with wear but sharp pressure usually gets worse.
Some heel movement during early break-in can be normal as the ankle softens. A heel that lifts clearly with every stride is not a break-in issue. It's a fit failure, and I would treat the heel test as the decisive pass or fail point. If a tall shaft won't reconcile your foot, ankle, and calf numbers, consider the modular route in our guide to horse riding half chaps rather than forcing the wrong size.
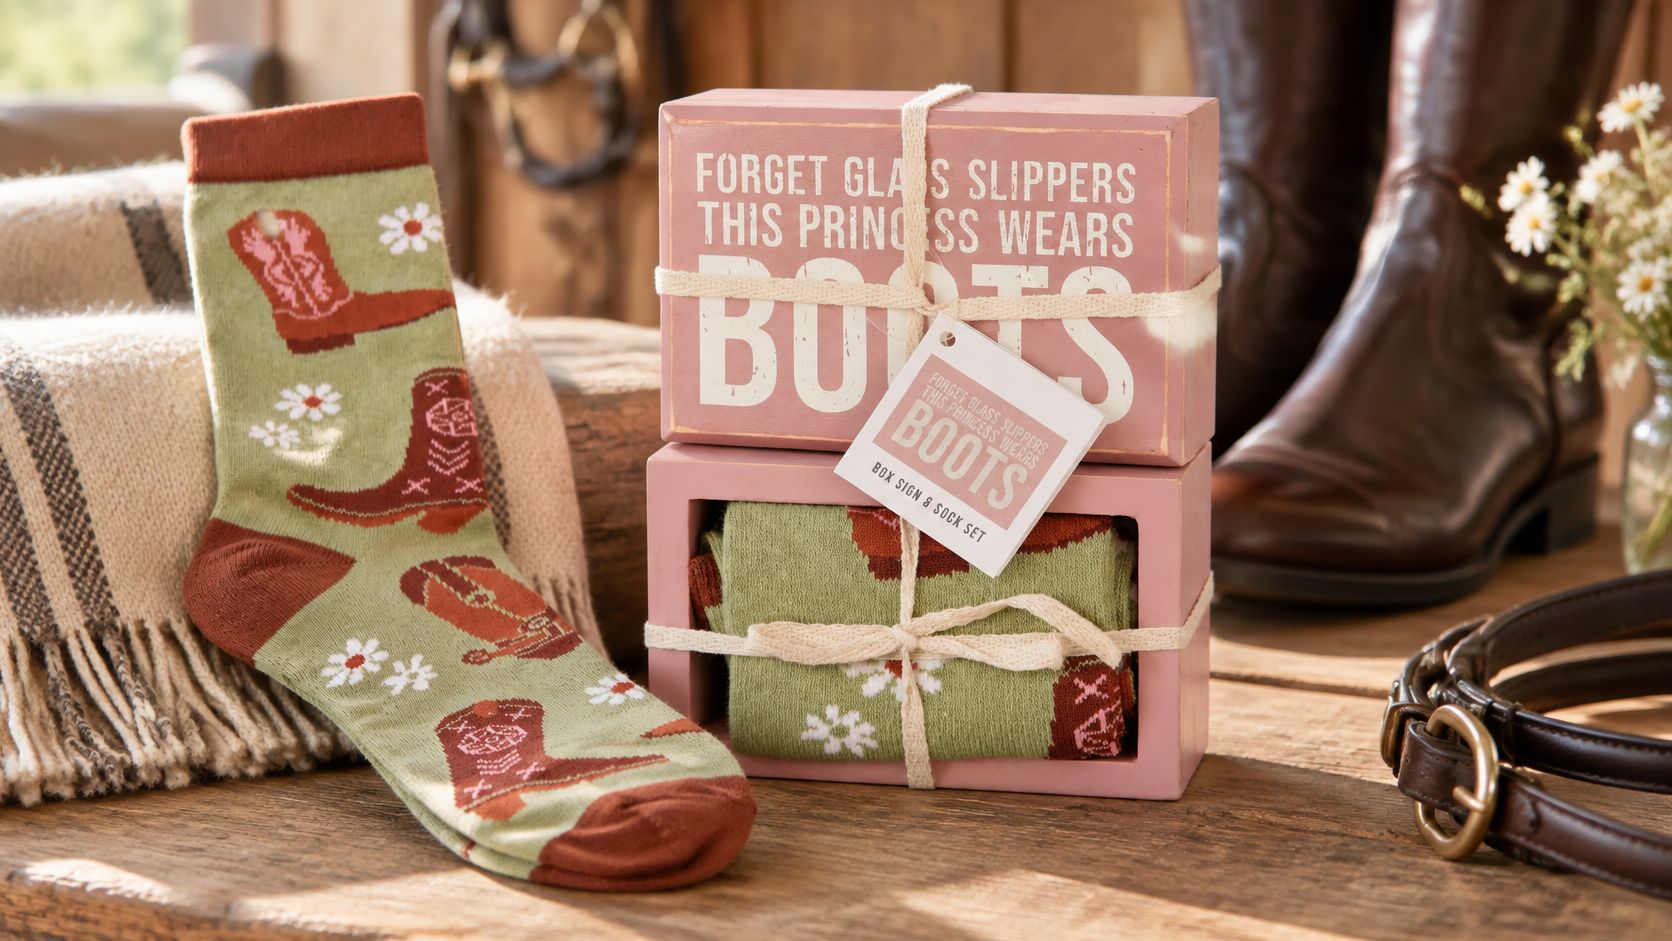
Fit checks also apply to the small extras you wear with boots. For example, "This Princess Wears Boots" Gift Set includes machine-washable cotton, nylon, and spandex socks described as one size fits most adults, with a 4.5" x 1.8" x 3" pink box sign. We offer 30-day free returns via Redo, which gives you a defined route if an eligible purchase doesn't suit.
Matching Boot Style to Your Riding Life
The standard tall-boot advice assumes a standard leg. Many riders don't have one. You may have wide or muscular calves, one calf larger than the other, swelling by late afternoon, a narrow foot with a broad calf, or a high instep that turns every zip into a negotiation.
The common assumption is that taller and stiffer automatically means better. It doesn't. A Chronicle of the Horse discussion of protective horse boot fit identifies poor fit, weight, restriction, heat buildup, and discomfort as key equipment problems, and the lesson transfers directly to rider footwear. More rigid isn't better if the boot rubs, restricts your ankle, overheats your leg, or makes you brace against it.
When modular beats tall
A well-fitting paddock boot and half-chap can outperform an ill-fitting tall boot that merely looks custom. You choose the foot fit and calf fit separately, adjust the chap for breeches or thicker socks, remove it for barn work, and replace one part without replacing the whole system. For commuting riders, instructors walking between lessons, and anyone whose measurements fluctuate, that's not a compromise. It's the more functional setup.
Tall boots still earn their place. If you show in classes that expect traditional turnout, need a formal dressage silhouette, or prefer one continuous shaft, buy tall. Just don't buy tall because you think serious riders must. I would take a secure, comfortable modular setup over a prestige shaft that leaves marks on your calf.
Three questions riders ask
Should tall boots feel tight at first? Firm across the calf can be normal before the leather gives and the ankle creases form. Pain, numbness, tingling, or a zip you can only close by force isn't normal. Circulation is a hard limit, not a break-in challenge.
How much drop is normal after break-in? Some softening and slouching around the ankle is expected, and the cuff usually settles lower as that crease forms. The heel should still seat firmly and the shaft should stay stable against your calf. If the whole boot slides down and twists, the fit was wrong from the start.
When should you choose paddock boots and half-chaps? Choose them when you ride mixed disciplines, walk a lot between rides, teach, commute to the barn, or have calves that change through the day. For changing calves, use your afternoon measurement as the deciding number, because that's the leg the boot must fit after work, travel, and warm weather.
Match those answers back to your discipline row. Formal competition may still require tall boots, but your everyday schooling boot can be the pair that fits your actual leg, schedule, and workload.
Choose Your Boot Before You Buy
Do the deciding at home, then use the shop or product page to confirm it. If you start by scrolling models, you'll end up comparing colours and discounts before you've settled the features that keep you safe and comfortable.
Your decision sequence
- Name your main discipline: Find its row in the quick-pick comparison and commit to the boot style and priority shown there.
- Pick a material carefully: Choose leather if you have break-in time and will condition it, or synthetic if you need low upkeep and easier wet-weather use.
- Measure before trying: Record foot length and width, calf circumference at the widest point and cuff height, ankle circumference, and leg height, then test with your normal socks and breeches.
- Run the safety checks: Reject any boot without a defined heel, a sole that can release, an enclosed firm toe, or a cuff clear of the back of your knee.
- Set a construction tier: Budget by expected years of use and riding frequency, not by the smallest number at checkout.
- Confirm returns first: Check the seller's return policy before ordering, so a poor fit can be exchanged without a fight.
The gift set pictured here is a reminder that boot culture extends beyond the arena, but your riding pair still has to earn its place through fit and function.
We run a gift shop for horse lovers and sell English and western designs, so we see riders mix serious equipment decisions with everyday equestrian style. Keep those choices separate. Buy gifts for joy, and buy riding boots because the discipline, measurements, and safety features line up.
Write down your discipline, your measurements, and your three essential safety features before you look at another model. Use that short list to filter every option, and don't let a sale talk you out of any line on it.
Once your boot criteria are written down, visit Bridle Up Hope Shop for horse-themed gifts, apparel, and accessories in English and western designs for riders and horse lovers. It's a fitting place to mark a new pair of boots, thank the person who held your horse while you shopped, or find a gift for a young rider starting out.

Leave a comment