


You've booked your first riding lesson, and now you're looking at boots that seem almost interchangeable. Some look like hiking boots, some reach the knee, and some cost more than the rest of your riding kit. You don't yet know which details matter or whether the pair you like will work at your riding school.
The best horse riding boots for beginners are the ones that fit both your foot and the stirrup you'll use. Start by asking your instructor what the school accepts, whether it lends boots, and how it checks footwear against its stirrups. That conversation can prevent an expensive mistake before you enter a shop.
Table of Contents
- Starter Boot Picks by Riding Situation
- Safety Features Every Beginner Boot Must Pass
- Materials, Budget Tiers and How Long Boots Last
- How to Try On Boots and Break Them In
- Newcomer and Gift-Giver Questions Answered
- Confirm Your First Pair Before You Buy
Starter Boot Picks by Riding Situation
For most beginners taking English lessons, paddock boots with a defined riding heel and a smooth, low-profile sole are the sensible starting point. For Western lessons, choose a purpose-made Western riding boot with a shaped toe and the same attention to heel, sole, and stirrup compatibility.
Don't begin with a brand ranking. Begin with your lesson type, then choose the simplest suitable boot within your budget.
Starter boot picks by riding situation
| Riding Situation | Boot to Start With | Heel and Sole Priority | Budget Tier |
|---|---|---|---|
| Regular English lessons | Paddock boot with defined heel | Modest, distinct riding heel; smooth, low-profile sole | Entry to mid-range |
| English lessons, showing later | Paddock boot now, tall boot later | Same riding heel and sole requirements; check calf fit before buying tall boots | Entry now, mid-range later |
| Western lessons or trail rides | Western riding boot with shaped toe | Defined riding heel; no thick lugs | Mid-range |
| Occasional rider at a school | Boots the stable lends or recommends | Match the stirrup width the school uses | Lowest cost |
| Any rider considering sneakers or hiking boots | Don't start here | Sneakers lack a suitable heel; hiking tread can catch | Not recommended |
English lessons and the paddock-first approach
A paddock boot is an ankle-height riding boot. It gives a new English rider a practical starting point without requiring the more involved calf and height fitting of a tall boot. Choose between laces and a zip according to what holds your foot comfortably, not what looks more advanced.
Half-chaps can be added over paddock boots for calf protection. They're separate coverings that fit around the lower leg, so you can adjust that part of your kit without replacing a comfortable boot.
If you hope to compete later, you don't need to buy for an imagined show wardrobe today. Learn what your instructor recommends for the discipline and competition you eventually choose. Tall boots need a suitable foot size, calf width, and shaft height, and buying them before you understand those measurements can leave you with an expensive pair you avoid wearing.
Western lessons and occasional riding
For Western lessons, look for a riding boot, not just a boot with Western decoration. A shaped toe can make placement in the stirrup easier, but an exaggerated point isn't a beginner requirement. The boot's overall width still needs checking.
Historical riding-boot design combined shaped toes for stirrup entry and withdrawal, heels to limit forward travel, and taller uppers to reduce rubbing from stirrup leathers, as described in the riding boot overview. Those functions matter more than embroidery, color, or a fashionable silhouette.
If you're unsure which lesson style you've booked, this comparison of Western and English riding can help you ask the school more precise questions.
For occasional school lessons, borrowed boots may be the most economical option. Ask about sizes and availability before arriving, then have the instructor check the actual pair. A school-owned boot still needs to fit your foot.
Practical rule: A borrowed riding boot that fits correctly is a better starting point than a fashionable new boot that hasn't been checked with the school's stirrups.
What belongs beside your riding kit
Rubber yard boots are useful for muddy paths, washing areas, and stable chores. Treat them as wet-day extras unless the specific model is intended for riding and your instructor approves its fit in the stirrup.
Keep equestrian-inspired clothing separate from protective equipment, too. The Equestrian Belle Époque Lace Balloon Pants have stretch satin, lace panels, and flowing balloon-style legs. Those are clothing details, not evidence of suitability for a lesson.
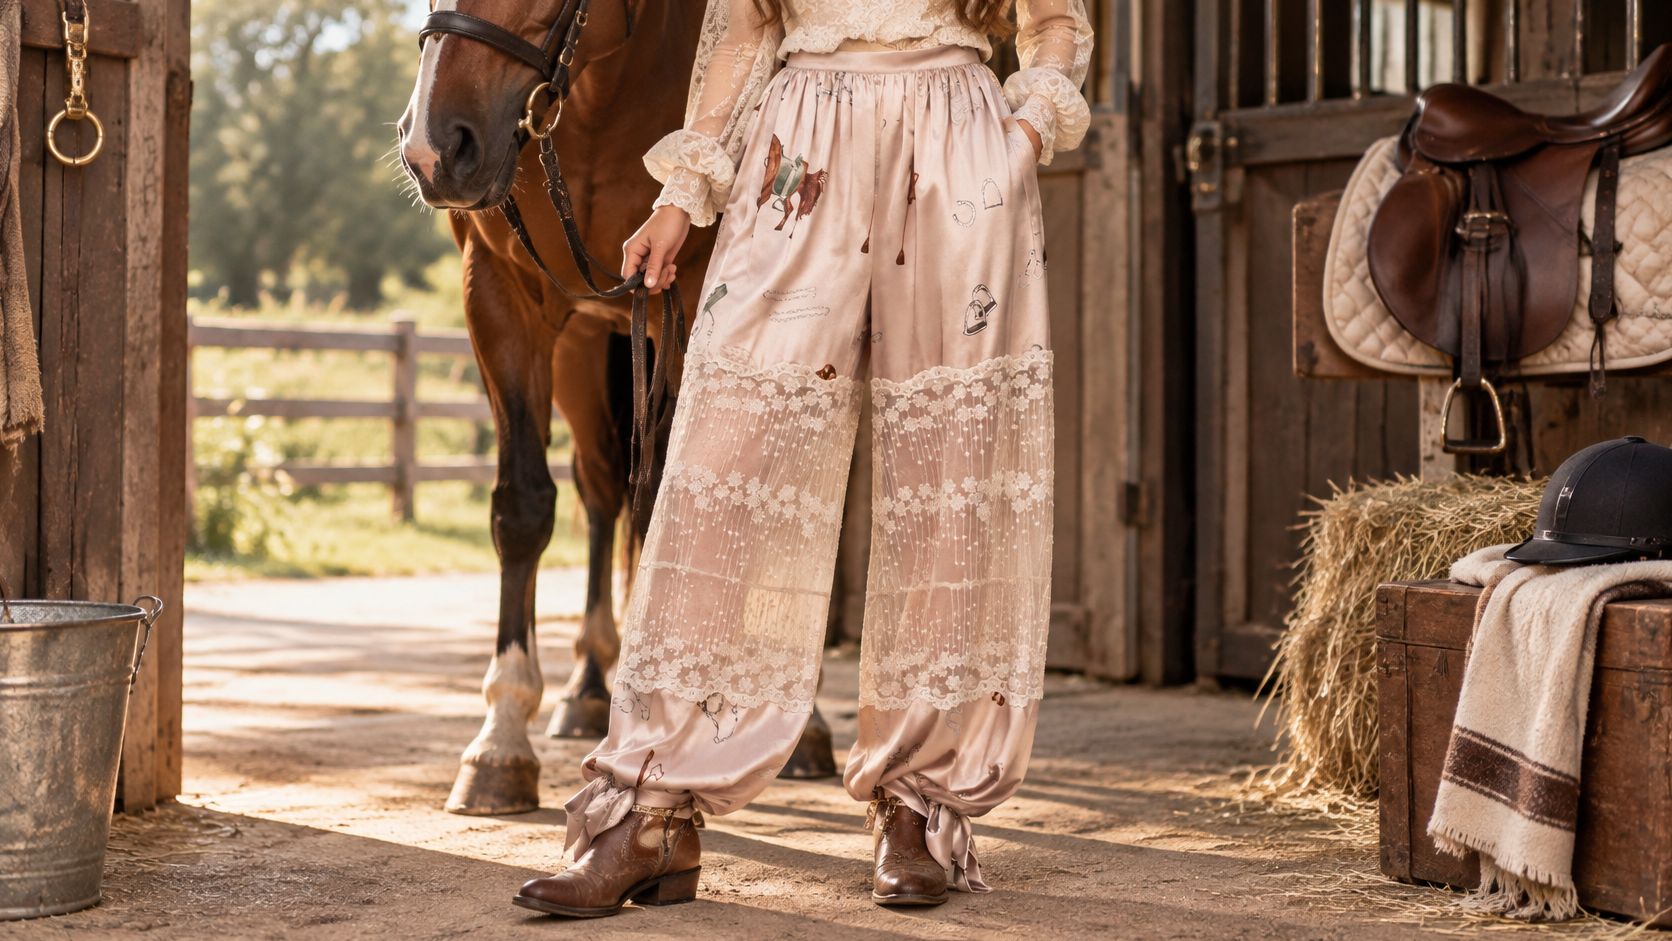
These recommendations assume you're beginning lessons at a riding school. For a single guided trail ride, contact the operator before buying anything, since its footwear requirements and lending arrangements may change your decision. Choose your situation from the table, then inspect the boot's construction before comparing colors.
Safety Features Every Beginner Boot Must Pass
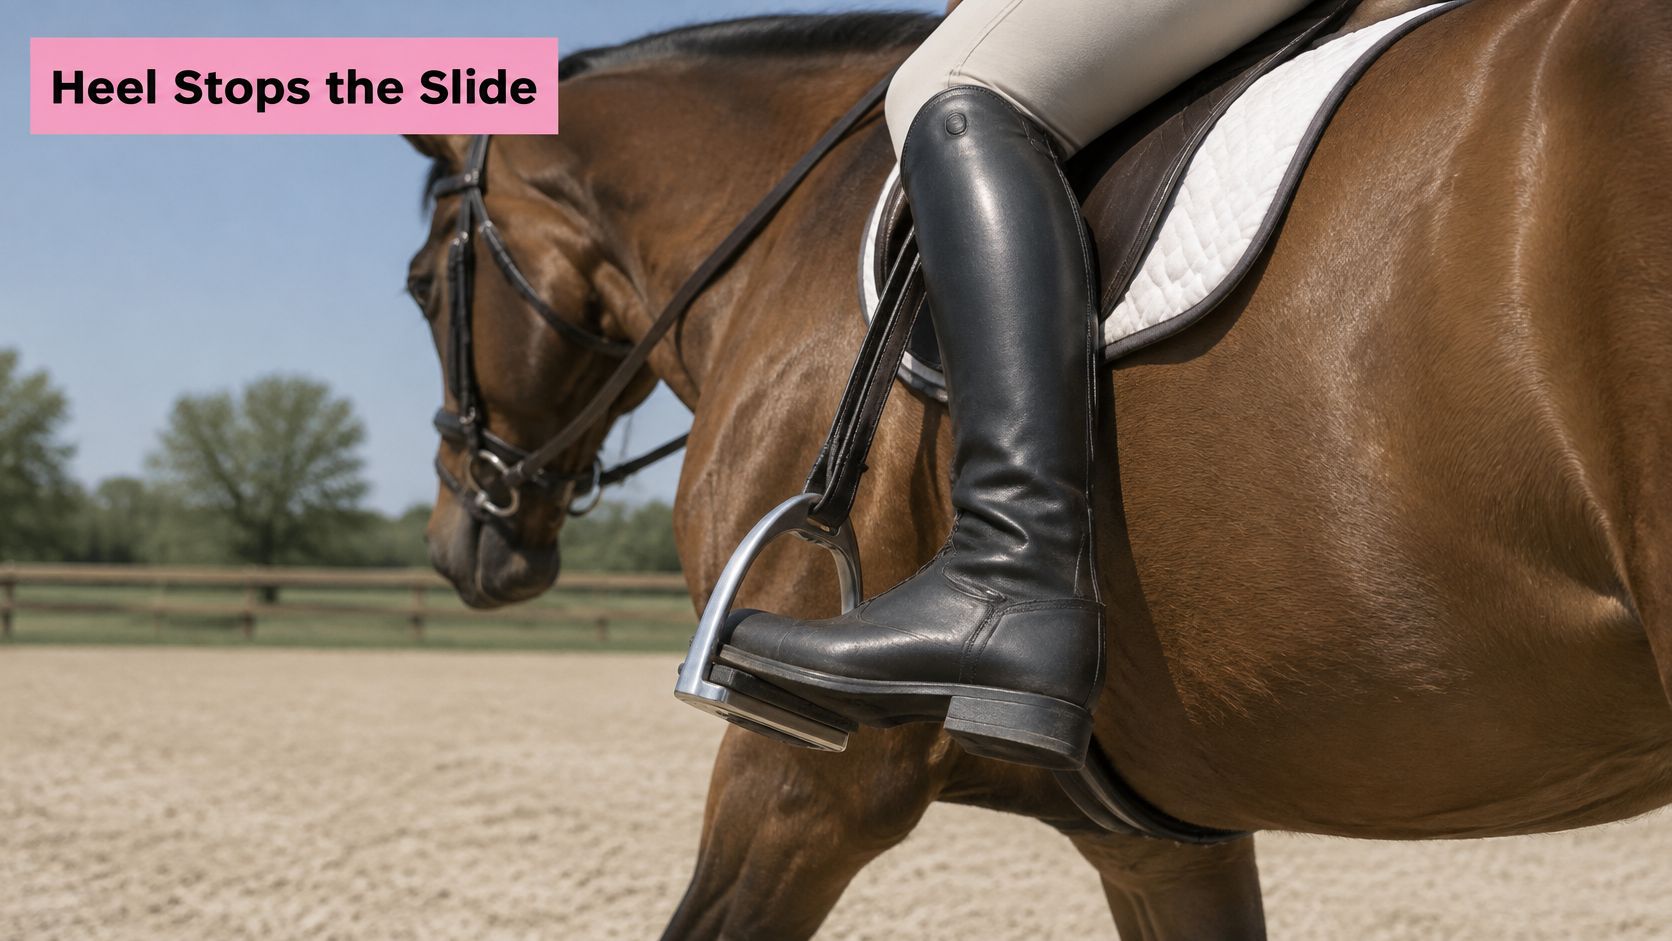
If your foot slides forward in the stirrup when a horse stops, the heel helps limit how far it travels. The boot and stirrup work as a pair: the heel needs to catch, while the sole should let your foot release if you fall.
A 2010 review in Current Sports Medicine Reports estimated 76,000–88,000 equestrian-related injuries annually in the United States, with falls or being thrown accounting for approximately 60%–80% of injuries. The review identified a defined heel, protective toe, and release-friendly sole as foundational boot features. These findings support treating riding boots as safety equipment, though they do not show that one style prevents every injury.
Check the construction, not just the label
A defined heel works like a stop at the back of a drawer: it helps keep the foot from sliding farther through the stirrup. The BETA Guide to Rider Safety Equipment gives a beginner specification of a defined heel of at least 0.5 inch, approximately 1.3 cm, together with a firm, relatively smooth sole and supportive shank. Match that shape to the school's stirrups. If your boot seems likely to catch or slip in them, ask the instructor to check the fit before you ride.
Safety features every beginner boot should pass
| Feature | Beginner Minimum | Why It Matters | Red Flag |
|---|---|---|---|
| Heel | Defined riding heel meeting the specification above | Helps stop the foot sliding through the stirrup | Flat running-shoe sole |
| Toe | Closed, firm or reinforced toe | Provides protection if a horse steps on the foot | Open or soft mesh toe |
| Sole | Firm, relatively smooth, low-profile | Allows controlled release from the stirrup | Deep lugs or hiking tread |
| Shank | Rigid support between heel and forefoot | Spreads stirrup pressure across the foot | Sole that folds through the middle |
| Ankle coverage | Secure coverage without restrictive pressure | Keeps the boot settled around the foot and ankle | Loose shaft or excessive heel lift |
A firm or reinforced toe offers some protection, but it cannot promise to prevent a crush injury. Steel-toe work boots are not an automatic upgrade: check that the toe, sole, heel, and overall construction suit riding and the stirrup.
Turn the boot over and inspect its tread. Deep lugs or prominent edges can catch against a stirrup, so choose a firm, relatively smooth sole instead. The shank is the support running between heel and forefoot. It should resist folding through the middle, while the forefoot still bends enough for comfortable movement.
Boots that almost qualify
A paddock boot with optional half-chaps can meet riding needs without the height of a competition boot. A high-heeled fashion boot may have a smooth sole, yet still lack suitable toe protection, stability, or riding construction. Test the actual boot with the riding school's stirrups. If the shapes do not work together, ask the instructor what approved boot or stirrup option to use before riding.
A child's purpose-made boot can pass every construction check and still become unsuitable as the child outgrows it. Assess the fit on the rider's foot, then confirm that the heel and sole work with the stirrup.
Materials, Budget Tiers and How Long Boots Last
Spend first on fit and protective construction, then on material. A premium leather boot that pinches your toes or crowds the stirrup isn't an upgrade over an inexpensive pair that fits correctly.
Material affects cleaning, flexibility, and the way a boot wears, but it doesn't provide a reliable lifespan on its own. Riding frequency, mud, storage, stitching, and zipper quality all influence when you'll need a replacement.
Materials and budget tiers for first boots
| Material | Budget Tier | Durability and Care | Best Fit |
|---|---|---|---|
| Synthetic or PU leather | Entry | Easy to wipe; surface can crack or peel under repeated flexing | Trial period and growing children |
| Genuine leather | Mid-range | Can soften with wear; needs suitable cleaning and conditioning | Weekly lessons and a first long-term pair |
| Full-grain leather | Mid-range to premium | Durable when well constructed and maintained; conditioning helps preserve suppleness | Frequent riders and outdoor yards |
| Rubber yard boot | Entry | Waterproof material and straightforward cleaning; fit may be less refined | Muddy stables and a spare pair |
| Premium hand-finished leather | Premium | May offer refined construction and more sizing choices; still needs care | Riders settled on their size and preferred style |
What the budget tiers actually mean
Entry-level boots should still meet the riding requirements. Their purpose is to let you begin without paying for elaborate finishing or a highly specialized fit. They're sensible for a child whose feet are changing or an adult testing whether lessons will become a regular commitment.
Mid-range boots are worth considering when you can identify what you need improved. That might mean a better-fitting ankle, more calf options, replaceable components, or leather that suits regular use. Don't assume a higher price solves a fit problem unless you can feel and verify the difference.
Premium construction is easier to justify once you know your preferences. Soft, finely finished leather can feel lovely, but softness alone doesn't guarantee durability. Likewise, genuine leather describes the material without telling you everything about its grade or construction.
Keep footwear in proportion to your wider horse riding costs. Spending so much on your first boots that you struggle to fund lessons isn't a useful trade.
Care that prevents avoidable damage
Synthetic uppers can deteriorate at repeated flex points, particularly where a surface coating begins to separate. Leather can dry and stiffen if neglected. Neither problem improves when boots stay muddy in a closed bag.
- Remove dirt promptly. Wipe away mud with a damp cloth and brush grit from seams and zipper teeth.
- Dry gently. Leave boots in a ventilated place, away from radiators and direct heat.
- Condition appropriately. Use a small amount of a conditioner intended for the leather finish, testing an inconspicuous area first.
- Support the shape. Use boot trees or suitable shaft supports for tall boots, and store them upright.
Use this video alongside hands-on fitting and the boot maker's care instructions.
For wet conditions, check whether the complete boot is described as waterproof, not merely whether its upper sheds a splash. Inspect worn boots for separating soles, damaged heels, failed fastenings, and weakened uppers. Replace compromised riding footwear rather than trying to recover its value through further use.
How to Try On Boots and Break Them In
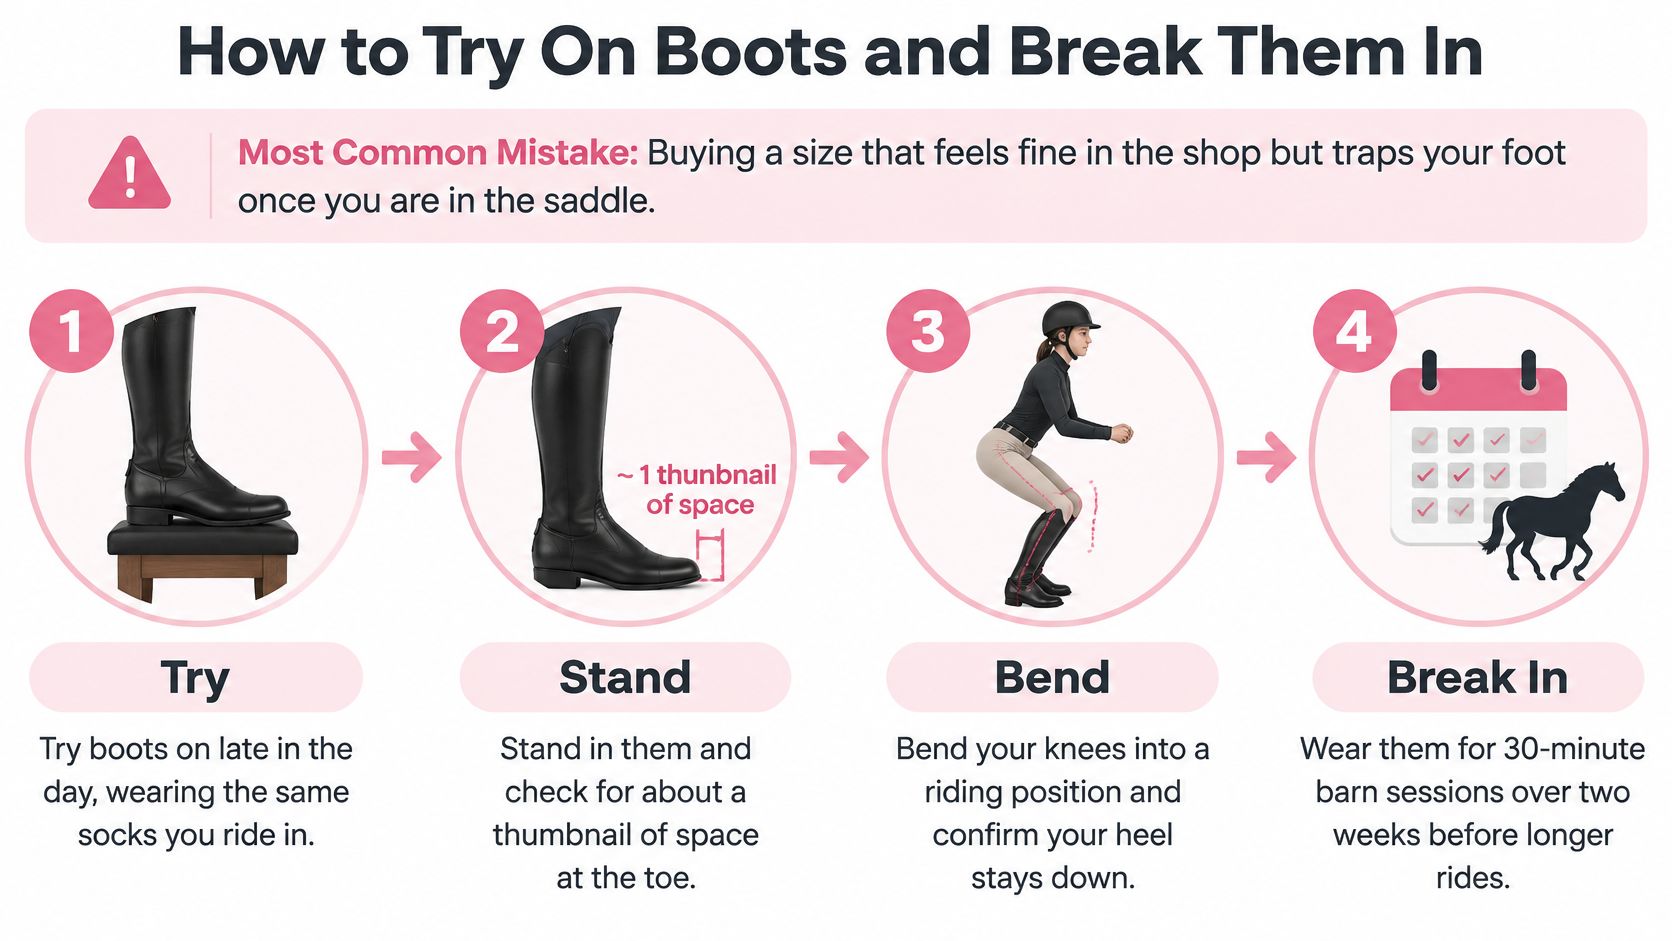
A boot can feel comfortable in a shop and still be unsuitable in the saddle. The common mistake is checking only the space inside the boot while ignoring its outside width.
Start at the riding school: ask which boots it accepts, whether it lends footwear, and whether your instructor can check a prospective pair before you remove the tags. Keep the receipt and confirm the retailer's return conditions before arranging a trial.
Follow a foot-and-stirrup fitting sequence
- Try boots later in the day. Wear the socks you'll ride in, rather than thick socks chosen to fill an oversized boot. Bring your half-chaps if you already have them so you can check the combined fit.
- Stand, then rise onto your toes. Check whether the foot stays securely positioned. Some pull-on designs fit differently from zipped paddock boots, but your heel shouldn't move so much that you lose control of the boot.
- Check the toes while bearing weight. Your toes shouldn't press against the front or curl to avoid pressure. Allow movement without choosing so much extra length that the foot slides.
- Walk, bend your ankles, and crouch. Notice pinching at the ankle, pressure over the instep, or rubbing behind the heel. For tall boots, close the zip or laces fully and check the calf in riding clothing, without forcing the fastening.
- Measure the boot and stirrup together. The University of Missouri Extension horse-safety guide recommends a stirrup approximately ½–¾ inch wider than the boot at the ball of the foot. Measure the boot's outside width, including the sole, rather than using your shoe size as a substitute.
- Have the instructor approve the actual combination. Ask them to check clearance and foot placement using the school's equipment. Don't assume a pair approved at another stable will automatically suit this one.
The fitting sequence below is a useful visual reminder. Break-in should follow comfort and the manufacturer's guidance rather than a fixed calendar.
Break in gently, then resolve persistent pressure
Wear new boots indoors for short periods while keeping them clean enough to return if necessary. Walk and flex your ankles naturally. Once the fit is approved, begin with shorter riding sessions rather than making a long outing their first use.
Leather may ease with wear, but pain isn't a fitting method. Stop if you develop numbness, sharp pressure, broken skin, or persistent rubbing. Don't soak boots or use aggressive heat to force them into shape.
Break-in can soften a correctly fitted boot. It can't make a fundamentally wrong size or shape appropriate.
If tall boots squeeze your calf, try another calf width, shaft height, or style. If your paddock boots fit but your lower-leg covering doesn't, use a horse riding half-chaps fitting guide to assess that separate component. Don't replace a comfortable boot merely to accommodate poorly fitted half-chaps.
Newcomer and Gift-Giver Questions Answered
Compatibility and first-lesson questions
-
Will these boots fit my riding school's stirrups?
Start with the riding school, not the shop. Tell the instructor, “The outside of this boot seems wider than the stirrup. Could you check the fit, and, if needed, lend me a suitable stirrup pair?” Bring the actual boots, because sole shape and outside width matter more than the size printed inside. If the boot is wider than the school's stirrup, have staff check whether a loan pair fits the saddle and suits the lesson. Don't force the boot into a tight stirrup or ride while waiting for a solution. -
Can I start in sneakers or hiking boots?
Arrange appropriate riding footwear instead. Sneakers usually lack the defined heel needed for stirrup use, while hiking boots may have tread that catches, even if they have a heel. A shoe that works for walking isn't automatically suitable for riding. If you can't get boots before the lesson, call the school rather than arriving and hoping for an exception. -
Do I need half-chaps immediately?
Ask whether your school recommends them for your first lessons. Half-chaps can protect your calf from rubbing and create a closer fit against the saddle, but they don't change the boot's heel, toe, or sole. If you borrow a pair, check that it closes comfortably over your riding clothes and leaves your ankle free to move.
Children, gifts, and mixed riding styles
-
How often will a child need new boots?
Recheck the fit regularly and whenever the child reports discomfort. Look for curled toes, pressure marks, trouble fastening the boot, or a change in how the child walks. Skip oversized boots bought for extra growing room. A correctly sized entry-level pair is more practical than an expensive pair the child has to grow into. -
Are riding boots a good gift?
Give a fitting opportunity unless you know the exact model and size the rider needs. Foot shape, calf measurements, lesson requirements, and stirrup fit all affect the choice. A gift card or shopping trip together lets the rider choose a suitable pair without losing the thought behind the gift. Check the return conditions before buying. -
Can one pair cover English and Western lessons?
Ask both instructors what they accept before choosing. Boot suitability depends on the school's equipment and saddle setup, so a pair accepted for one lesson may not work for another. Buy primarily for the lessons you take most often, then confirm whether that same pair is acceptable elsewhere. Skip a second pair bought only to match another discipline's appearance.
Confirm Your First Pair Before You Buy
Before shopping, ask your riding school which stirrups you will use and whether it can check a borrowed or new pair. A boot that fits your foot may still sit poorly in the stirrup, so the school is the best place to start. Bring your usual riding socks and compare the actual boot with the actual stirrup.
For online listings, look for a stated riding purpose, heel details, a clear view of the sole, material information, and notes about support inside the boot. If the listing leaves a construction question unanswered, ask the retailer before buying or choose a listing with clearer details.
Take this checklist to the fitting
- Lesson match. Confirm that your instructor accepts the style for your lessons.
- School compatibility. Have the instructor check the boot in the stirrup you will use. If it does not fit that setup, ask whether another school stirrup is available before deciding to buy.
- Movement test. Walk, stand, rise onto your toes, and crouch. Notice pressure, slipping, or restriction that could distract you in a lesson.
- Purchase safeguards. Check the return conditions before ordering, and keep the packaging and receipt until the fit is confirmed.
For a gift, offer a fitting or let the rider choose the model. Foot shape, calf fit, lesson requirements, and stirrup compatibility make a surprise pair hard to select; a gift card or shopping trip avoids asking someone to keep unsuitable boots.
Buy for the riding you're doing
A borrowed pair is often the better choice if it fits comfortably, your instructor approves it for the school's stirrups, and you are still learning what your regular lessons require. Buy when you can confirm the fit and school compatibility, or when borrowing no longer meets your lesson needs. If the school's stirrups do not suit the boot, ask the instructor about an acceptable alternative before purchasing.
Specialist tack shops, school-recommended retailers, and online stores can all help you compare options. Bridle Up Hope Shop carries equestrian apparel, accessories, and gifts; check any footwear separately against your instructor's requirements.
Consider an upgrade when you can identify a practical need, such as weather protection, a different calf fit, or construction suited to frequent riding. Arrange a boot check or fitting at your stable before buying, and take your intended riding socks.
Bridle Up Hope Shop also offers horse-themed gifts in English and Western styles. Browse Bridle Up Hope Shop for clothing or a gift card, so a new rider can choose their own fit-sensitive items.
Deje un comentario