


The popular advice to choose a softer, more padded, or bitless accessory misses the important question: where will the pressure go? Horse bridle accessories can change how a bridle sits, how a rein signal reaches the horse, and what happens when a strap takes load. None earns a gentleness rating just from its name.
Start with the job, then check compatibility, fit, and the horse's response. Color and sparkle come after those decisions, even when you're buying something that looks mainly decorative.
Table of Contents
- Horse Bridle Accessories at a Glance
- How the Pieces Group on the Head
- Browbands Cheekpieces and Throatlatches
- Nosebands Bit Guards and Converters
- Reins Breastplates and Martingales
- Measure and Compare English and Western Parts
- Fit Checks for This Horse
- Inspect Clean and Condition Every Piece
- Decide Whether to Add or Replace a Piece
Horse Bridle Accessories at a Glance
Horse bridle accessories by job, style, and load
| Accessory | Main job | Usual style | Safety role |
|---|---|---|---|
| Browband | Stops the headstall sliding back and frames the face | Both; showier in English | Positioning |
| Cheekpieces | Set bit height and carry force to the crown | Both | Load-bearing |
| Throatlatch | Helps keep the bridle from coming over the ears | Both | Retention; must stay loose |
| Cavesson noseband | Encircles the nose above the bit without normally supporting it | English | Carries pressure if tightened or loaded |
| Flash noseband | Adds a lower strap fastening below the bit | English | Can restrict the jaw |
| Drop noseband | Sits lower to limit mouth opening | English | Airway and lip clearance are critical |
| Grackle or figure-eight | Crosses the nose to limit jaw crossing | English, often eventing | Pressure at the crossover and straps |
| Bosal | Provides nose control in a traditional hackamore | Western | Primary control surface |
| Reins | Connect the rider's hands to the bit or nose gear | Both; split, romal, loop, or paired | Primary load |
| Bit guards | Place soft discs between bit rings and lips | Mostly English | Cushioning, not structural support |
| Bit converter | Bridges specified bit attachment points, commonly on a pelham, for a single rein | English | Load-bearing; changes how the rein acts |
| Breastplate or breast collar | Limits saddle slip; some breastplates anchor a martingale | English breastplate; Western breast collar | Load on saddle and attachments |
| Standing martingale | Connects an appropriate noseband to a strap toward the girth | English | Limits head height through nose pressure |
| Running martingale | Routes reins through rings that alter their line of pull | English | Conditional rein pressure |
Read the safety role before the style
A crystal browband and a rein aren't the same purchase. The browband helps position the headstall and carries decoration; the rein is a primary communication line to the mouth or nose. A loose crystal setting is a different problem from a rein attachment that can open under tension, although neither belongs against the horse.
Positioning doesn't mean unimportant. A short browband can pull other parts out of place without carrying the rider's direct rein load. Cushioning has a narrower job still: a bit guard can separate moving metal from a lip, but it can't make an unsuitable mouthpiece fit.
Load-bearing parts need particular attention at stitching, folds, fasteners, and metal connections. Follow the whole route rather than judging the visible strap alone. A handsome breastplate is only as secure as the tabs and rings connecting it to the saddle.
Similar appearance doesn't mean the same job
A Western bosal belongs beside this list as a separate nose-control tool, not as another English noseband. Likewise, a Western tie-down isn't a standing martingale with different styling, and a curb strap isn't a throatlatch.
- Buying for a particular horse: Assess the complete bridle on that horse before committing to an accessory.
- Updating an existing headstall: Compare the attachment dimensions before choosing the finish.
- Shopping for appearance: Establish whether the item positions, cushions, or carries force before treating it as decoration.
How the Pieces Group on the Head
Say you take a plain English snaffle bridle off its hook. Its straps make more sense when you sort them into working families rather than trying to memorize every buckle.
The headstall family includes the crown, browband, cheekpieces, and throatlatch. Together, they carry and retain the bridle. The mouth family contains the bit, its rings, any bit guards, and compatible converters, where the rein signal reaches the mouth.
This diagram separates the supporting structure from the communication lines and auxiliary fittings.
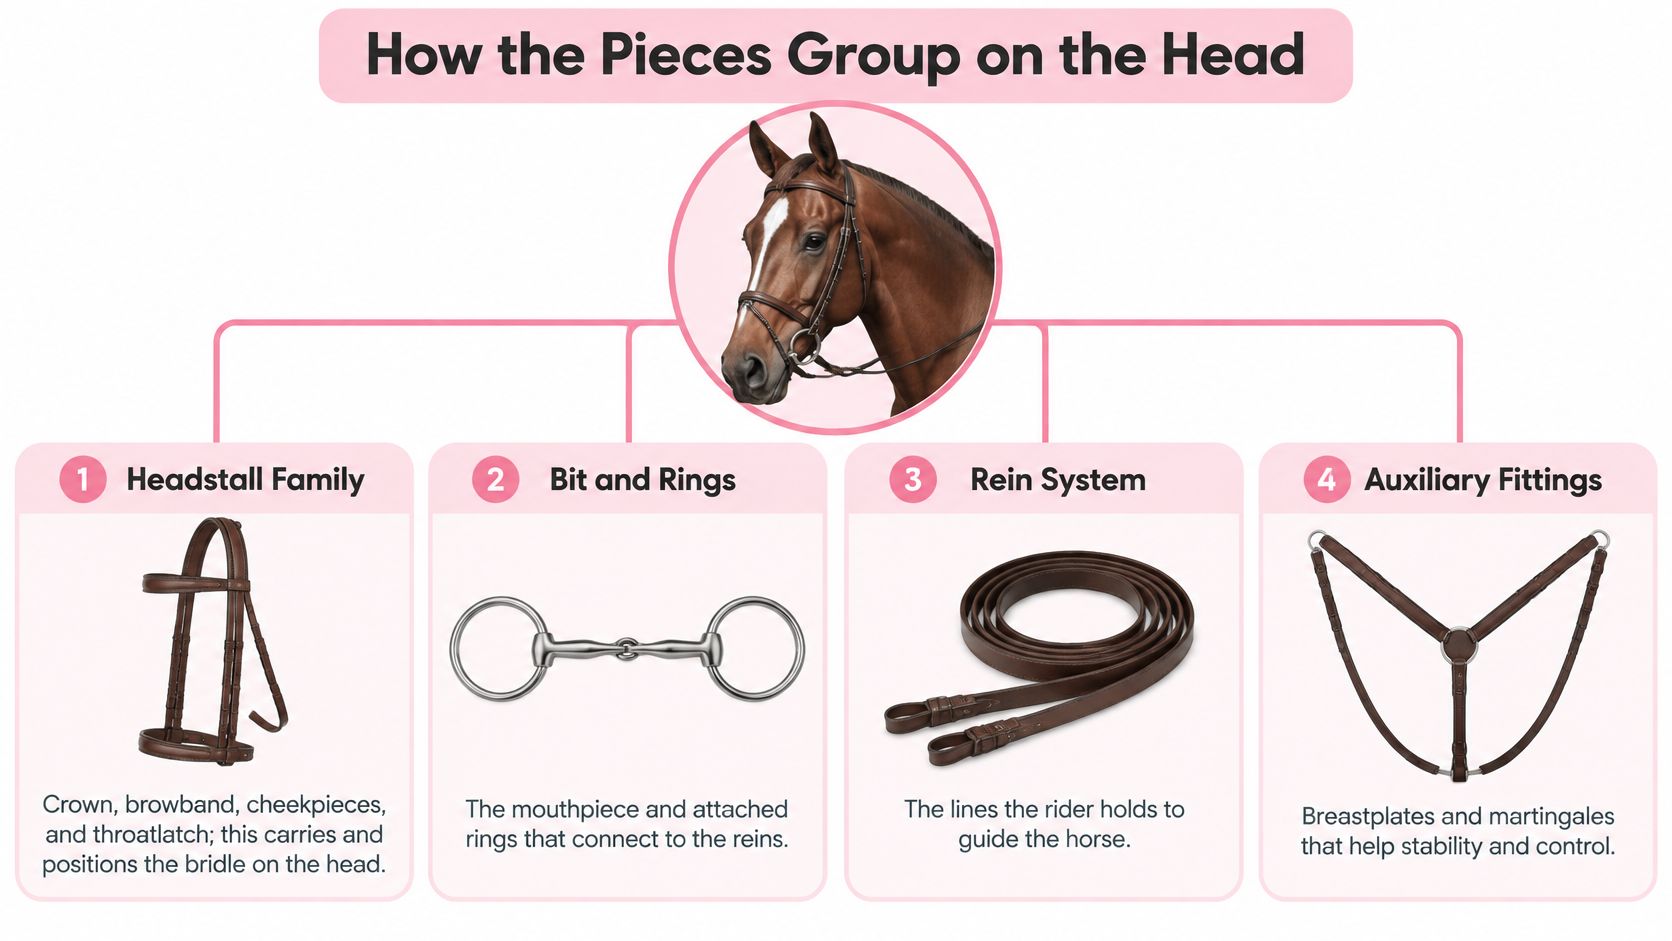
Trace a complete setup
The nose family includes cavesson, flash, drop, and grackle nosebands, while the bosal belongs to a distinct Western system. The rein and body-attachment family connects the rider's hands and, where used, the breastplate, breast collar, or martingale. These aren't all head fittings, but their forces can reach the bridle.
- English snaffle example: A headstall supports a snaffle bit, with reins attached to its rings and a separate cavesson around the nose.
- Western curb example: A shaped headstall supports the curb bit, split reins attach to the appropriate rein connections, and a curb strap works beneath the jaw without an English noseband.
The Equestrian Research Atlas history of the bridle describes metal bits from the second millennium BCE and Luristan fittings that show the old core of mouthpiece, cheek-pieces, and attachment rings, while perishable leather and cord survive less often. The familiar lesson is practical: understand the connections, not just the names.
Browbands Cheekpieces and Throatlatches
These parts determine whether the bridle stays in its intended position. Before adjusting them, loosen the reins and let the horse hold its head naturally. Pulling the head into a posed outline can hide a strap that catches during ordinary movement.
Let the browband span the forehead
A browband should follow the forehead without dragging the crown forward into the backs of the ears. Padding, patent leather, and crystals don't compensate for a band that's too short. A curved browband also needs enough usable length between its end loops, not merely an attractive drop in the middle.
When replacing one, check how its loops accommodate the crown straps and any separate noseband hanger. A crowded loop can bunch those straps together; an oversized loop may let the band shift. Keep decorative fittings away from the skin and check the underside for projecting stitching or settings.
Say an English bridle fits well until you add a thick padded browband. If the new loops squeeze the crown straps into a stack, the replacement has changed the fit even though its advertised size matches.
Practical rule: Decoration belongs on a correctly sized structure. It isn't a reason to accept a strap that pulls its neighbors out of place.
Use cheekpieces to position the bit
Cheekpieces connect the bit to the crown. Their useful adjustment range matters more than the size printed on a tag: you need the bit correctly placed without fastening at an awkward extreme.
Long cheekpieces may leave the adjustment buckles crowded near the browband and jaw joint. Short ones can hold the bit too high while leaving little room to adjust downward. Neither problem is solved by changing rein length.
Check both sides independently. A bridle can look symmetrical on the hook yet sit unevenly because the straps have stretched differently or the bit attachments aren't fastened alike.
- Follow the strap: It should take a clean route down the side of the face rather than being pulled sideways by another fitting.
- Check the buckle: Lay it flat and make sure its tongue is fully seated.
- Check the attachment: Close billets completely and secure their ends in the keepers.
Keep the throatlatch a retainer
The throatlatch helps retain the bridle; it isn't supposed to cinch the throat. Leave enough freedom for swallowing and flexion, and assess it when the horse changes head position, not only while standing square.
Tightening it won't correct an oversized crown or an unsuitable headstall shape. If the bridle shifts badly, investigate the structure instead of using the throatlatch as a clamp.
A Western one-ear or split-ear headstall may have no separate browband. That isn't a missing decorative opportunity. Don't improvise a browband attachment to make it resemble an English bridle, and have an experienced Western professional assess retention for the intended bit and use.
Nosebands Bit Guards and Converters
Bitless doesn't mean pressure-free. Horse Sport's coverage of poll pressure and bridle fitting describes poll pressure, nuchal-ligament tension, and ear sensitivity in horses using bitted and bitless bridles. Removing the mouthpiece changes the pressure route; it doesn't remove the need to assess that route.
Separate nose restraint from nose control
A cavesson encircles the nose above the bit. Contrary to a common explanation, a plain cavesson doesn't normally hold the bit up or directly steady its mouthpiece. Its effect changes if it's tightened or used as an attachment point.
A flash adds a lower strap that closes below the bit. A drop takes a different, lower route around the nose and chin groove. A grackle crosses over the nose, so the crossover pad, strap edges, and side fittings all deserve attention.
- Cavesson: Don't mistake a tidy appearance for a reason to tighten it.
- Flash or drop: Check that the strap doesn't trap a lip against the bit.
- Grackle: Padding at the crossover doesn't excuse pressure from misplaced side fittings.
- Bosal: Treat its shape, balance, heel knot, and rein arrangement as parts of a dedicated control system.
None of these is a sensible way to conceal unexplained mouth opening. A horse may be responding to discomfort, rein handling, or a training problem; closing the visible response doesn't identify the cause.
Cushioning and signal changes are different purchases
Bit guards sit between the bit rings and lips. They can help prevent pinching, but they also occupy space. Adding them without reassessing the bit's usable width may create crowding instead of comfort.
Bit converters, sometimes called roundings, commonly bridge a pelham's snaffle and curb rein attachment points so a single rein acts through both. They reduce the rider's ability to separate those actions. They don't turn the bit into a snaffle.
A connector on an ordinary loose-ring snaffle doesn't automatically create mechanical advantage. Sellers use similar names for different gadgets, so identify the exact attachment path rather than ordering a generic bit clip.
A softer-looking attachment can still deliver a strong signal. Judge what it connects and what happens when the rider takes the rein.
With a sidepull, cross-under bridle, or bosal, check how promptly the system releases when the hand yields. Ask a qualified fitter and an appropriate trainer to assess a proposed change; involve a veterinarian if resistance comes with soreness or a sudden behavioral change.
Reins Breastplates and Martingales
Start with the reins because they're the connection you must be able to trust in your hand. Grip material matters, but a comfortable rubber covering won't compensate for damaged leather at the bit end.
Look past the broad, visible straps when examining a complete bridle.

Follow the primary connection
English reins may be plain leather, rubber-gripped, web, or laced. Western split reins have separate ends; romal reins include joined reins and a romal extension. Choose a form suited to the rider's established handling and discipline, rather than assuming all Western reins are used in the same way.
Billets, buckles, ties, or clips must be appropriate to the bit connection and securely closed. Pull along the intended load direction by hand while inspecting the fastening. Don't use a clip that can catch neighboring hardware and open.
After reins, prioritize body attachments that could pull equipment out of position if they fail.
- Breastplate: Helps limit backward saddle movement and may carry a martingale attachment.
- Breast collar: Serves a related saddle-stability purpose in Western tack, using its own attachment arrangement.
- Attachment tabs: Need inspection alongside the larger straps; they can be less visible while carrying substantial load.
Neither breast piece should substitute for investigating persistent saddle movement with a saddle fitter.
Understand the limit a martingale sets
A standing martingale connects to an appropriate cavesson and limits upward head movement through the nose. A running martingale routes the reins through rings, changing their line of pull when they engage. Correct rein stops prevent those rings from traveling forward onto the bit attachments.
This video can accompany a hands-on discussion of tack, but individual fitting still needs assessment on the horse.
A martingale limits a position. It doesn't repair a sore mouth or explain why a horse raises its head, so don't add one as a response to unexplained resistance.
Vegetable-tanned bridle leather and suitable synthetics can both serve well. Favor smooth hardware, sound stitching, and a construction you can inspect and maintain over a material label alone.
Measure and Compare English and Western Parts
Measure the existing bridle before ordering replacement horse bridle accessories. Use a flexible tape for curved straps and a ruler or caliper for widths, buckle openings, and hole spacing. Photograph the assembled connections so you're comparing the actual arrangement, not your memory of it.
Record the browband's usable length between its loops and the loop openings themselves. Note cheekpiece length at the working adjustment, strap width, and the bit width marked on the mouthpiece, then verify the bit measurement if the marking is unclear. Compare like measurements: overall strap length and working length aren't interchangeable.
Decide whether the connection is compatible
English and Western bridle parts compared for swapping
| Component | English norm | Western norm | Swap? |
|---|---|---|---|
| Browband | Separate shaped strap, sometimes padded or crystal | Often absent on one-ear or split-ear headstalls | Only within similar headstalls and compatible loop or attachment patterns |
| Cheekpieces | Buckles set snaffle or double-bridle bit height | Headstall cheeks suit their intended bit hangers | Only when the bit hanger and strap dimensions match |
| Throatlatch | Loose retention strap, separate or integrated | Throat strap where fitted; curb strap is separate | Only with compatible retention design; a curb strap isn't a throatlatch |
| Noseband | Cavesson, flash, drop, or grackle | Often none; bosal is hackamore gear | Not across these systems as an equivalent part |
| Reins | Pair or loop; leather, rubber, or web | Commonly split reins or romal | Only with suitable attachments and an intentional change in handling |
| Bit hardware | Snaffle rings, pelham, or double bridle | Snaffle fittings or curb shanks with curb chain or strap | Not by appearance; converters aren't curb chains |
| Martingale or tie-down | Standing or running martingale | Tie-down with a distinct attachment arrangement | Not as a direct replacement |
| Breast piece | Hunting or other breastplate designs | Breast collar | Related job, different hardware and fitting |
A buckle tongue needs to seat properly in the adjustment hole without forcing or excessive play. The buckle's internal width must suit the strap, and the folded strap must fit through its keeper without bunching. Don't punch improvised holes to rescue a mismatched component.
Michigan State University Extension's bridle-fitting guidance advises checking the entire bridle for abnormal wear or weakness and ensuring the reins are securely attached. That makes compatibility a whole-bridle inspection, not merely a test of whether a new buckle closes.
Pay attention when a swap changes the action
A curb strap works with the curb bit beneath the jaw; a converter joins particular rein attachment points. They aren't alternative ways to finish the same outfit. Substituting either without understanding the mechanism changes more than appearance.
Likewise, moving from loop reins to split reins changes how the rider manages the ends and uses the free hand. Our guide to Western versus English riding provides context for those riding differences, but competition eligibility still requires checking the current rules for the actual class.
- Quick-release fittings: Confirm they're designed for that use and won't open through contact with adjacent hardware.
- Gift purchases: Obtain measurements and photographs from the rider rather than relying on a breed or size label.
- Matched components: Arrange an on-horse assessment even after the mechanical connections pass.
A compatible part can still sit badly on a particular head.
Fit Checks for This Horse
Fit is a welfare and performance requirement for an individual horse, not a breed-size chart. Assess the bridle with the horse relaxed, then observe it during movement and ordinary rein contact. A strap can clear the skin at rest and press into it when the horse flexes.
The British Horse Society's bridle-fit guide recommends hand clearance beneath the crown and approximately two fingers of clearance below the facial crest when positioning a cavesson or crank noseband. Placement and tightness are separate checks: a finger-width placement guide doesn't tell you how tightly to fasten the strap.
Walk around the head
Use the illustration as a reminder, then assess the noseband and mouthpiece separately.
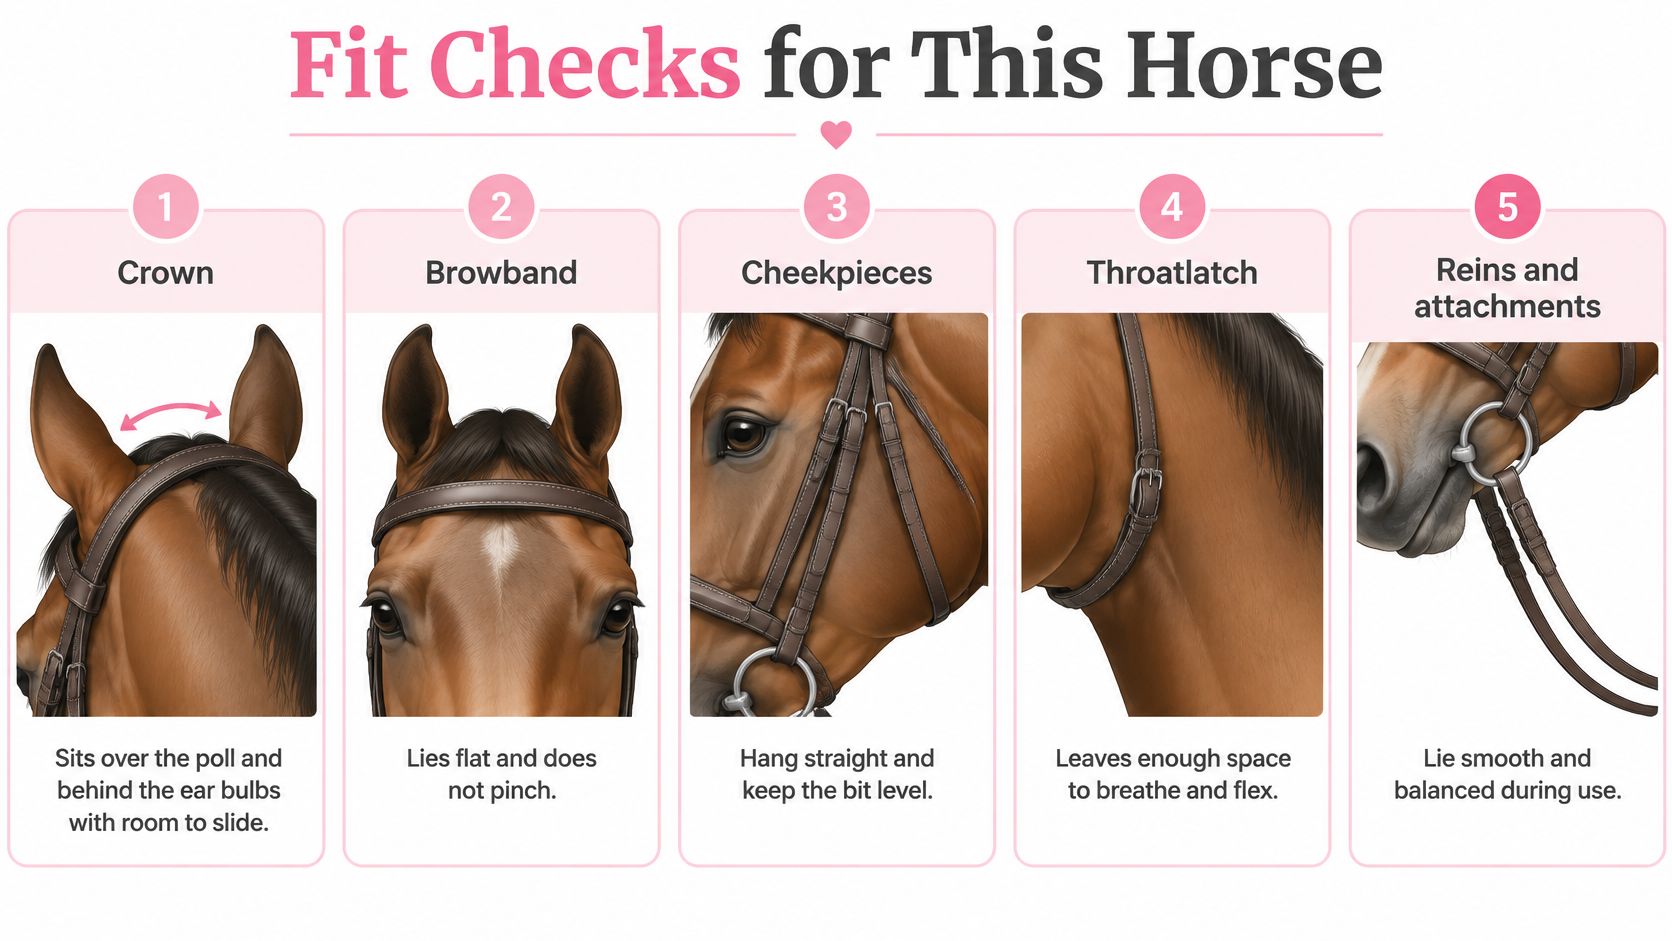
- Crown and ears: Place the crown over the poll, behind the ear bulbs. Check the edges as well as the padded center, and make sure the ears can move freely.
- Browband: Look for a flat, comfortable span without tension pulling the crown toward the ears.
- Cheekpieces: Keep them behind the facial crest, with buckles clear of the lips and bony jaw. Crowding near the browband calls for reassessing their length.
- Throatlatch: Check clearance during flexion and swallowing. It must retain without compressing the throat.
- Noseband: Keep low straps off the soft nostril area and allow comfortable jaw movement. Don't use a crank fastening to force the mouth closed.
- Bit and reins: Keep the mouthpiece level and assess its height against the horse's lip shape and bit design. A mouth-corner wrinkle can guide fitting, but isn't proof that the mouthpiece suits the horse.
An anatomical headpiece can only distribute pressure usefully when its shape clears that horse's sensitive areas. A cutaway that misses the ear bulb provides no benefit because the label says anatomical.
Let the horse override the appearance
After untacking, check for hair loss, rubbed edges, heat, swelling, or tenderness. During work, pay attention to head tossing, gaping, reluctance to accept contact, or a sudden change in how the horse carries the bridle.
A neat photograph isn't a fit test. The horse's skin, movement, and response matter more than matching strap ends.
Stop using the suspect addition until a qualified bridle fitter has assessed it. If the horse is sore, has swelling, or shows a sudden unexplained change, involve a veterinarian rather than repeatedly experimenting with equipment. Physical condition matters too: even a correctly positioned strap needs sound holes, stitching, and fasteners.
Inspect Clean and Condition Every Piece
Tack care is a safety protocol, not just preparation for a polished turnout. Inspect before cleaning so dirt doesn't distract you from stretched leather, damaged stitching, or a fastener that no longer seats properly.
The British Horse Society's tack-affordability guidance warns that stretched adjustment holes may make a bridle unsafe. Treat a hole that has elongated under load as a replacement warning, not as convenient extra adjustment.
Make the pre-ride inspection systematic
- Start with loaded straps. Flex reins, cheekpieces, and breastplate or martingale straps gently to reveal cracks and broken stitching, especially at folds.
- Inspect adjustment holes. Look closely at the holes currently in use and the leather between neighboring holes.
- Open the fasteners. Confirm buckle tongues, billets, snaps, and rein attachments seat fully when reclosed.
- Feel the hardware. Check rings and converters for bends, sharp edges, corrosion, and rough areas hidden against leather.
- Secure loose ends. Make sure keepers retain the billets without splitting or letting them slide free.
Don't test questionable tack by riding in it. Set it aside clearly so another rider doesn't accidentally use it.
Clean for the material
For leather, lift dirt and sweat with a lightly damp cloth and a leather-appropriate glycerin or saddle soap. Work into folds without soaking them, remove residue, and let the leather dry away from direct heat before applying a light, suitable conditioner. More conditioner isn't automatically better; leave the surface supple rather than greasy.
For nylon and other synthetics, remove salt and grit with water and a suitable mild cleaner, rinse away residue, and dry fully. Don't apply leather oil to synthetic straps. Inspect the hardware and stitching just as carefully as you would on leather.
Clean and condition leather before storage, then use a breathable cover in a cool, dry space. Humidity encourages mold; excessive dryness can lead to cracking. Suitable horse tack hooks help keep straps organized and off the floor without forcing tight folds.
Keep non-tack items separate from the working inspection area. Vintage Equestrian Playing Cards are horse-themed cards with vintage equestrian designs on their backs, intended for downtime rather than equipment care.
Record the material, hardware condition, cleaning and conditioning dates, and replacement trigger. Open stitching, through-cracks, compromised reins, or bent hardware mean replacement or qualified repair before use, never concealment beneath a new accessory.
Decide Whether to Add or Replace a Piece
Keep a component when it remains sound, suits the intended system, and works comfortably on the horse. Replace it when structural wear compromises its job. Don't add a noseband, converter, or martingale merely to suppress a behavior you haven't investigated.
A fitter can assess the equipment, a trainer can assess the rider's handling and schooling, and a veterinarian can investigate soreness or sudden resistance. Choosing the right professional is often more useful than choosing another strap.
Give fitted tack only with the rider's input
If you don't know the horse's bit size, headstall dimensions, or attachment arrangement, leave working tack to the person who does. Even a browband isn't a harmless guess if it changes the crown's position.
- Known measurements and preferences: Let the rider approve the exact fitted component.
- Unknown setup: Favor a non-load-bearing gift rather than a surprise equipment change.
- Online browsing: Use our horse accessories online guide to distinguish personal accessories from horse-worn equipment.
Our charitable purpose is separate from any tack recommendation. The Bridle Up Hope charity's mission is to inspire hope, confidence, and resilience in girls and women through horses and habits. Supporting that mission should never require guessing what fits a horse.
At Bridle Up Hope Shop, we offer horse-themed gifts, apparel, jewelry, and home goods in English and Western designs, so you can celebrate equestrian style without guessing at working-tack fit. Visit for a gift for the horse lover while leaving fitted bridle parts to the rider and their qualified fitter. We donate 100% of the profits from each purchase to help the girls, women, and horses at the Bridle Up Hope charity.

Leave a comment